I just got the Stampin Up Dasher Stamp so I sat down and got to work on some cards for the Christmas season. I love this stamp, its so elegant.


With this series of Christmas cards I used nearly navy and white Stampin Up cardstock, Silver cardstock I bought from Micheals, Encore Silver ink.
I used nearly navy stampin up cardstock and a silver cardstock I picked up at Michaels. Dasher and the snowflakes were stamped using Encore Silver ink.
I used Stampin Up red and nearly navy cardstock and a silver cardstock I bought at Micheals. I used Encore silver ink to stamp Dasher, Merry Christmas, and snowflakes and Stampin Up nearly navy to stamp Deck the Halls. I used the Encore Silver ink to ink the edges of the oval that I cut using the Creative Memories cutting system. I added 2 small red plastic jewels that I got a Wal Mart to the silver cardstock. I attached the Merry Christmas oval to the silver cardstock strip with extra thick foam dots. I used a silver making memories stamp to attach the nearly navy cardstock with dasher stamped on it to a small silver piece to add visual balance.
I like the simplisity of this card. I used red, teal, and white Stampin Up cardstock. Dasher and 'tis the season was stamped using Encore gold ink.
For this card I used red and a teal with white Stampin Up card stock and then heat embossed snowflakes with gold Stampin Up embossing powder for the background. Dasher was stamped with Encore gold ink.
I used red, chocolate, and carmel Stampin Up cardstock, a yellow printed paper and 3 Making Memories antiqued brass snaps. The ribbon is a cheap gift wrap ribbon with Merry Christmas printed in gold. Dasher was stamped using Encore gold ink.


More Ideas to stamp with Dasher...
Stampin Up Dasher Stamp - Pictures of Handmade Christmas Cards

Handmade Cards - Love

I have a hard time making the same card over and over so I make sets instead. With this set I choose a couple of patterned papers, a main stamp, a background stamp, and an ink color. I use up as much of the supplies as possible making different looks. 
The Butterfly Love stamp is made by Stampology and I picked it up at WalMart recently. The flower background stamp is a bitty background stamp set from Stampin' Up, which is a discontinued set I bought 4 years ago. The ink is Stampin' Up Baroque Burgandy, another discontinued item I bought about 4 years back. 
Handmade Blooming Gift Box for Christmas

I got this idea from Country Heart and Home, take a moment to check out her blooming gift box, its fabulous. you'll have to scroll down a bit as she talks about other things first, but it's worth it.
I didn't have a template so I used an hexagon shape from the Creative Memories Cutting System to measure out the base.
For the first inner most box I used the smallest hexagon shape and measured out 2" for each side and then connected each square to create triangles that connected the squares.

(this is the lid at 1" for the box use 2")
I cut out the whole shape and then cut each square on one side. I scored all the other lines so that the squares would bend up and the triangles would bend across to connect each square securely creating a box. I glued the triangles to the folded up squares creating a box.

I then took the next sized hexagon base and measured 2" sides to create squares across from each other. I did NOT create triangles this time. I cut out the shape and scored the lines that connected the squares to the octagon in order to bend the squares up.

I repeated this with the last sized hexagon. You could make as many layers as you wanted to by adding hexagon bases that are anywhere from 1/4" to 1/2" bigger then the last. I stayed with 3 shapes to make it easier.

I then decorated the squares with pictures and stamps from Stampin' Up.


To secure the whole thing together in a box I made the lid. The hexagon shape for the top was the same size as the largest base hexagon. I then measured 1" from the octagon base to make the sides of the top. As with the innermost box I connected the rectangles to make triangles and cut slit on one side of each rectangle. I scored all the lines and folded the shapes to connect to each other.

I then covered the top with Christmas patterned paper by cutting out the same shape minus the triangles. I glued it to the card stock lid and used a Christmas ribbon around the sides.


Stampin Up Handmade Cards - Pictures


I always love the Stampin Up Handmade cards my friends give me - Here are two:


Click to See more pictures of Handmade Cards and Other Stamping Projects:
Fabulous Handmade Cupcake Boxes


Folding Handmade Greeting Card / Scrapbook Embellishment

This card was hand stamped using Stampin Up stamps and cardstock. I like the center opening because it's different from the usual folded card.


Handmade Cards Ideas - Pictures

These are simple handmade cards. These layouts are good if you want to make a bunch of cards quickly for a craft sale or just to have on hand in case of emergency. All the stamps are from stampin up - but all have been discontinued so you would have to look at ebay for a set.


Halloween Treat Card

For my daughter's class I put together a halloween treat card to give out to her classmates. I printed out the finger Jello receipe on the back of the card so parents could make finger Jello treats for their children. I used a halloween stamp from Stampin Up and Really Rust Stampin Up paper and ink.
I used a scoring blade to make two folds, a 1/2 inch apart,so the card was 4" high by 3" wide.
My daughter helped stamp the cards and attached the chocolate bars to the inside of the cards. She then folded the cards on the scored lines.
Lots of card making ideas
Some Wonderful Card Ideas
Some amazing stamps and a card gallery
Simplistic and Easy Spring Friendship Card

I love the 3 box design on this white card. The card has been divided into equal horizontal thirds, which is pleasing to the eye. The center third was stamped with 3 colored boxes with a piece of vellum stamped with 3 spring designs. I facened the vellum with snaps. The bottom third was stamped with the word friendship.
This is a versitile design that can be utilized in any colour scheme and season.
All stamps from stampin' up.
Organizing the Scrapbook Stuff - I have so much Scrapbooking Supplies Organizing it is a Nightmare
I have to put together a home office in the corner of my bedroom. I need the home office for work but I was thinking of incorporating all my scrapbook, family, and business stuff into the space. Not easy considering the minimal amount of funds and space I have available.
Organizing 12x12 scrapbook paper can be tricky because it doesn't fit traditional business sized filing systems. This is why such items as 12x12 hanging file folders and 12x12 file folders are so perfect. Only thing is what can hold 12x12 file folders? How about a blue 12x12 box specifically meant to organize your 12x12 Scrapbook paper?
The 12x12 cascade folders are a handy way to organize your papers and if you have as much scrapbook paper as I do you may want to color code the paper with the matching 12x12 cascade folder color.
I have scrapbook stuff in rubbermaid three / four / and seven drawers on wheels. Not much to look at but at least everything has a place. I cover it with beautiful brown cloth I picked up from Wal Mart for .10/meter. They are great for the cutters, magazines, and various tools but aren't big enough for the paper.
I do file the 8x11 cardstock and larger embellishments in a rubbermaid file box with lid and find it very handy when I need a color or a themed embellishment. I would prefer to file the 12x12 paper the same way along with all the work and personal files. I have a cedar chest that I will have my husband convert to a very large file cabinet so the 12x12 files will fit along with the regular letter sized. This may take some creative fabrication on his part with 2 different width sizes. If I just had the boxes then I could pull out the box I wanted to find the file of. It would also be handier for work as I will be travelling a lot and will need to take boxes of files with me.
The smaller embellishments like buttons, eyelets, and brads were easy to organize in a fishing tackle box. Perfect sized compartments for them and I was able to organize the paints, inks, and embossing powders in the larger compartment. Makes it easy to pick it up and take with me when I want to work somewhere else besides home.
Trying to keep everything at hand and in order can be difficult, there are lots of organizing products out there in the market. Which works best for you?
2.Groovy Retro Theme Birthday Party Invitation Template
3.Purse shaped girls birthday card.
Blooming Flower Card or Scrapbook Embellishment

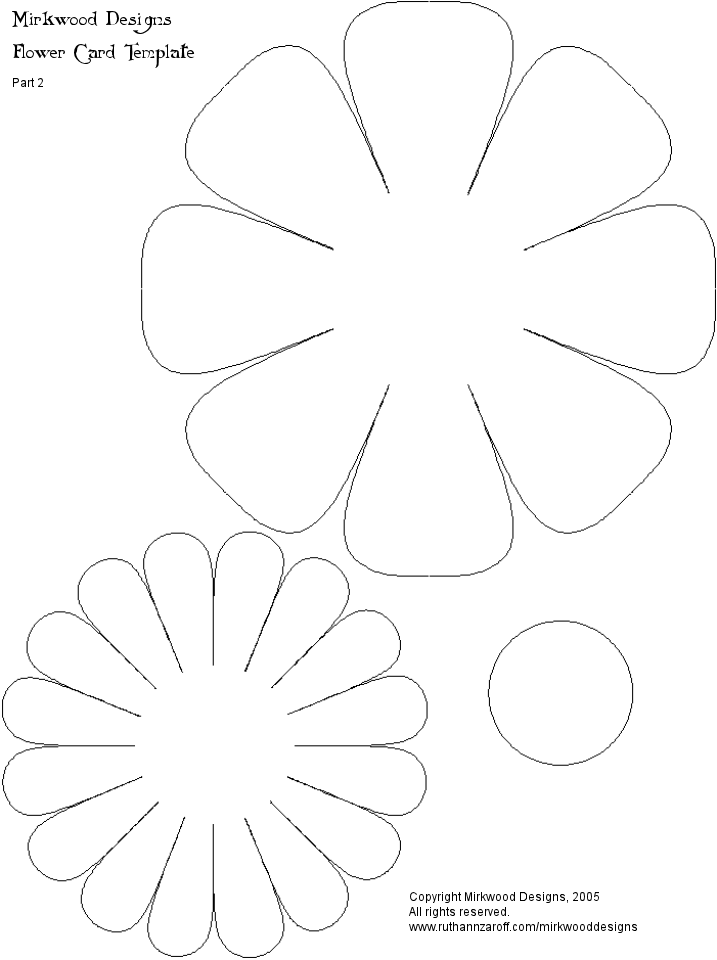
I found this great template to make a blooming flower card and created both a thank you card and a scrapbook embellishment / card. Can be used to make so many different types of cards or scrapbook embellishments.
First cut out the 4 pieces of the template and then decorate both sides of each petal with either pictures or stamps. The great thing about making a scrapbook embellishment is you can use up pictures that are hanging around. Glue all the pieces together and fold each petal into the center and secure with either a ribbon or a piece of paper wrapped around the card.
 Check out this Blooming Gift Box
1. Link to the flower template
2.Groovy Retro Theme Birthday Party Invitation Template
3.Purse shaped girls birthday card.
4.Organizing Scrapbook Supplies
Scrapbook titles made from scratch
70's Theme or Groovy Girls Theme Birthday Party Invitations Print Out
I've been working on a birthday card for a groovy girls party and so far I've come up with a card shaped as a pair of bell bottoms. Here are the images of a template I put together. Which do you like best?
Bell Bottom Pants Card #1
Bell Bottom Pants Card #2
The inside of the card
I could use patterned paper and cut out the shape for each card. Then each card could have it's own pattern making each invitation unique.
Purse Birthday Party Invitation Cards
Organizing Scrapbook Supplies


 Posts
Posts